前言
每个人可能都会有这样的经历:在写文档时,每做了一定的修改后,都会单独保存为一个版本。若只保留最新的一个,将其他的都删掉,又怕哪一天再会用到。改动的次数多了,就有下图的情况:
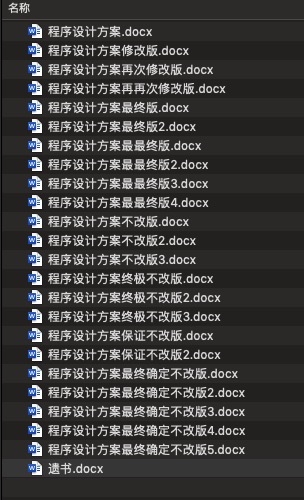
而在过了段时间后,每个备份中的内容及差异,就很可能记不清楚了。
上面所说的就是最简单低级的“版本控制”。
版本控制分三类:本地版本控制,集中式版本控制和分布式版本控制。本文要介绍的就是分布式版本控制工具的顶流代表:Git。
一、什么是Git
Git是一个开源的分布式版本控制系统,是目前世界上最快、最简单、也是最流行的版本控制工具,它可以有效、高速的管理从很小到非常大的项目版本。
二、SVN与Git的区别
1.代码管理方式的区别
SVN是集中式的版本控制系统,版本库是集中存放在中央管理服务器,保存所有的文件的修订版本,而协同工作的项目成员都通过客户端连到这台服务器,取出最新的文件或者提交更新。优点是代码集中管理,权限控制强;缺点是必须联网,中央服务器出现故障,会导致全部节点不可用。
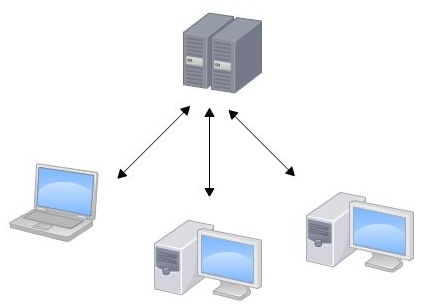
Git是分布式版本控制系统,同SVN一样也有中央服务器(很多资料上都说没有,实际上有,但作用仅仅是方便各成员之间的代码同步),但Git更倾向被使用于分布式模式,也就是每个项目成员从中心版本库/服务器上chect out代码后会在自己的机器上克隆一个自己的版本库。这样,即使中央服务器或某个开发节点出现了故障,不会影响其他人继续工作,并能够从任一个节点克隆的版本库进行恢复。缺点就是每个成员都有项目的完整代码,有一定的风险。

2.版本号区别
Git分布式版本管理系统,采用40位长的哈希值作为版本号,不会出现重复;
SVN的版本号是连续的,可以预判下一个版本号;
3.代码检出区别
SVN,每个子目录都维护着自己的.svn目录,记录着该目录中文件的修改情况以及和服务器端仓库的对应关系。SVN可以chenkout部分路径下的内容,即部分检出,而不用checkout整个版本库或分支;
Git没有部分检出,并且git的本地仓库信息完全维护在project根目录的.git目录下。
4.分支实现区别
SVN的分支和标签,本质上都是来自目录拷贝,通常约定是拷贝在branches/和tags/目录。所谓分支、tag等概念都只是仓库中不同路径上的一个对象或索引而已。
Git中的分支实际上仅是一个包含所指对象校验和(40个字符长度SHA-1哈希值)的文件。Git的分支是完全隔离的,一个提交一般只能发生在一个分支中。
本文主要介绍的是Git,关于更多Git与SVN的其他差别,请参考其他资料。
三、安装Git
1.Windows下的安装
在git官网下载安装包:https://git-scm.com/
双击安装包,进行安装,一路按默认next进行安装即可。安装完成后,启动Git Bash
在命令行中输入命令查看git的版本
git --version
git version 2.37.3.windows.1
2.Mac下的安装
Mac下的Git需要通过brew来安装,还没有安装brew的需要先安装brew ( https://brew.sh/index_zh-cn )
/bin/bash -c "$(curl -fsSL https://raw.githubusercontent.com/Homebrew/install/HEAD/install.sh)"安装Git
brew install git我的Mac是x86的,brew安装的软件会安装到 /usr/local/Cellar/git/2.37.3
若是新款M1或M2芯片的机型会安装到/opt/hemebrew/Cellar 目录下
将新安装的git配置到环境变量中,我的Mac系统是Mojave 10.14.6,系统shell默认是bash,配置文件是~/.bash_profile。从Catalina 10.15.x开始,系统shell默认是zsh,配置文件是~/.zshrc
vim ~/.bash_profile

export GIT_PATH=/usr/local/Cellar/git/2.37.3
export PATH=$GIT_PATH/bin::$PATH

source ~/.bash_profile
查看git的版本
git --version

git version 2.37.3
3.Centos下的安装
Centos默认以及yum中的默认git版本均为1.8.1版本;
通过下面的命令更新安装包仓库
yum install http://opensource.wandisco.com/centos/7/git/x86_64/wandisco-git-release-7-2.noarch.rpm卸载旧版本的git
yum remove git再次安装git
yum install git安装完成后,查看git的版本
git --version

git version 2.31.1
4.Ubuntu下的安装
Ubuntu默认没有安装git,这里使用 sudo apt install git 进行安装
sudo apt install git安装过程中会提示输入管理员root的密码
安装完成后,使用 git –version进行查验
git --version
git version 2.34.1
四、基础知识点
1.版本库
每个被Git管理的项目的根目录都会有一个.git隐藏目录,这个目录是Git用来保存元数据和对象数据库的地方。每次克隆镜像仓库时,实际上拷贝的就是这个目录中的数据。
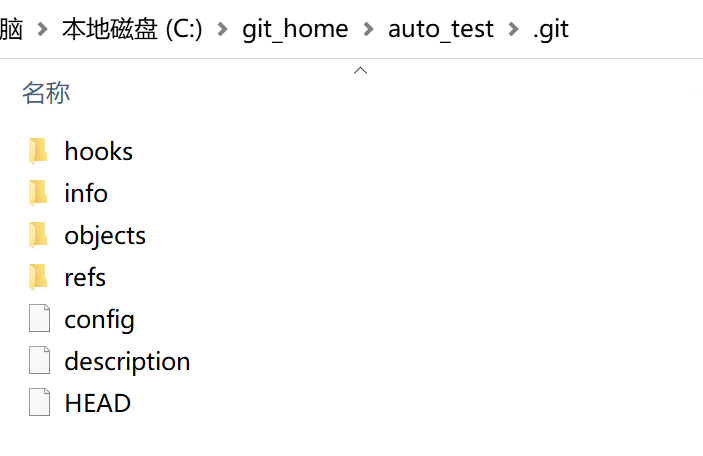
版本库中各个内容的作用含义:
hooks/存放一些预先定义好的脚本,用于在特定场合比如合并、提交代码等操作时的一些前置处理或后置处理;info/包含git仓库的一些信息;logs/保存所有更新的引用记录。logs目录下方有refs目录和HEAD文件refs/目录中一般会有两个目录heads/和remotes/heads/存储所有本地分支的对象,每个本地分支对应一个文件名。每个文件存储的是对应本地分支下的操作记录。使用git branch查看本地所有分支时,查询出的分支就是heads目录下所有文件名称remotes/存储所有远程分支的对象,所有远程分支对应一个文件名。每个文件存储的是对应远程分支下的操作记录。
objects/存放所有git对象,哈希值一共40位,前2位作为目录名称,后38位作为对象文件名;refs/一般有三个子目录:heads、remotes和tagsheads/存储所有本地分支的对象,每个本地分支名对应一个文件名。文件中存储了分支最近一次提交commit对应的id(哈希值)remotes/远程仓库信息,其中/refs/remotes/origin/HEAD记录了当前分支指向的远程分支,即当前分支提交到的远程分支;tags/给发布的内容做个标记
COMMIT_EDITMSG:存储着最近一次的提交信息,只是一个记录文件,无实际意义config:存储当前仓库的配置信息description:描述信息文件HEAD:HEAD指针,它指向了当前分支,这个文件记录了当前分支是哪个分支;index: 暂存区(stage),一个二进制文件;
2.Git的4个区
- Workspace:工作区,是电脑上的实际目录,即所属项目的根目录
- Index/Stage:暂存区,类似于缓存区域,临时保存改动
- Local Repository:本地仓库,即.git目录下的内容
- Remote Repository:远程仓库
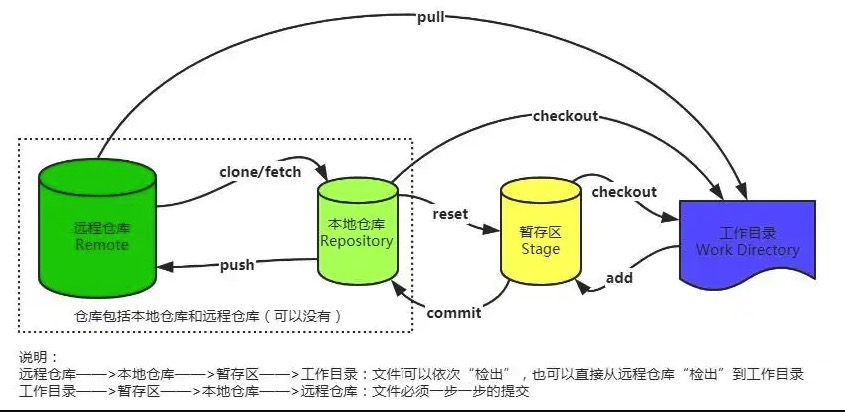
3.Git的3个最基本操作
参照3.2的图示,Git最基本的流程就是:工作目录—>暂存区—>本地仓库—>远程仓库
这个最基本的流程有3步操作:
git add .把所有文件放入暂存区;git commit把所有文件从暂存区提交到本地仓库;git push把所有文件从本地仓库推送到远程仓库;
4.文件的5种状态
Untracked:未追踪,在工作区中未被git进行管理的文件
modified:已修改,文件做了变更
Staged:已暂存,文件被提交到了暂存区
Committed:已提交,文件被提交到了本地仓库
Pushed:已推送,文件被推送到了远程仓库
五、配置本机与服务器的通信
1.Git两种通信协议方式
本地计算机与Git远端服务器(GitHub、Gitlab等)进行通信时,传输主要基于两种协议,HTTPS和SSH,对应的仓库地址就是HTTPS URLs和SSH URLs。
a. HTTPS URLs
GitHub官方推荐采用HTTPS URLs的方式,因为该种方式适用面更广(即使在有防火墙或代理的情况下也同样适用),使用更方便,配置也相对简单。HTTPS使用的端口号是443。
b. SSH URLs
SSH URLs更适用于内部开发的项目使用,在使用SSH URLs方式之前,需要先在本地计算机生成SSH Key密钥对,包括公钥和私钥。默认情况下,生成的密钥位于$HOME/.ssh/目录中,文件名分别为id_rsa(私钥)和id_rsa.pub(公钥)。SSH使用的端口号是22。
2.配置Git用户和邮箱
设置用户姓名:git config --global user.name "姓名"
设置用户邮箱:git config --global user.email "联系邮箱"
git config --global user.name "laobai"

git config --global user.email "laobai@plscript.cn"通过git config --list查看已有的配置信息:
git config --list

core.excludesfile=/Users/laobai/.gitignore_global
user.name=laobai
user.email=laobai@plscript.cn--global选项是全局设定,即所有项目都用这个设定值。若某个项目部使用这个值,可以在对应项目执行上面的设置命令,去掉--global选项即可,设定的配置保存在对应项目的.git/config文件中。
3.生成SSH密钥
a.通常的命令为:ssh-keygen -t rsa -C "<comment>"
其中:
ssh-keygen:是生成密钥对的命令,git安装完后,这个命令就有了;
-t:后面跟生成密钥的加密算法,上面的命令中是常用的 rsa加密,还有DSA、ECDSA、ED25519等;
-C:后面跟备注信息,通常写email,也可以是其他能够唯一标识这个密钥的关键词等;
-f:生成密钥对的路径及文件名,多在本机需要生成多套密钥对时使用(上面的命令里没写,但有可能会用到)
b.输入ssh-keygen -t rsa -C "laobai@plscript.cn"回车,提示输入文件路径及文件名,这里直接回车,按默认路径默认文件名进行保存,然后提示输入密码,(这个密码是通信时的二次验证密码)这里不输入直接回车,再次回车,生成密钥对,id_rsa和id_rsa.pub两个文件,其中id_rsa是私钥,做好保密;id_rsa.pub是公钥,可以公开给任意一个Git代码仓库。
ssh-keygen -t rsa -C "laobai@plscript.cn"
Generating public/private rsa key pair.
Enter file in which to save the key (/c/Users/laobai/.ssh/id_rsa):
Created directory '/c/Users/laobai/.ssh'.
Enter passphrase (empty for no passphrase):
Enter same passphrase again:
Your identification has been saved in /c/Users/laobai/.ssh/id_rsa
Your public key has been saved in /c/Users/laobai/.ssh/id_rsa.pub
The key fingerprint is:
SHA256:1Bwhi8vpERw54t5sXEln8mpSrbkvAmavsXPFO2brG2Y laobai@plscript.cn
The key's randomart image is:
+---[RSA 3072]----+
|      ... o.     |
|    ..ooo=o.     |
|   . .+ooBo      |
|    .. =+ o      |
|   . +=+S+       |
|    =.*.B        |
|   o.+.+Eo       |
|    .o+oB.       |
|    o+ =+*.      |
+----[SHA256]-----+
c.这里以Gitee为例,将生成的公钥添加到Gitee的SSH公钥设置中。

点击gitee个人账号设置-安全设置-SSH公钥
复制id_rsa.pub的内容,粘贴到公钥文本框中
cat id_rsa.pub
ssh-rsa AAAAB3NzaC1yc2EAAAADAQABAAABgQCosYCd8x3icYoN73e/FH50JcytnxvTUnaSLulN+yvEESJ6B0IpYo7930trVQQGuAu+nvZJpk8RDR/KgjyUPP0J40nQ2364Y1Mfk5E2Zrlv0OaP3GiEuysCRE7auHWnz0BWSMJvZrs0ShQ3c+176iGVISliq/g1zjGM5tjsvIiOlZ9/o5U/TXxR6FldeE6r+BiR9gieWkokocnsCseRH+s6eN6RQw+/rOq9HdcfSQlIwN/1hGssF7evvi/I31uSwcmhga3iJSoZc1v04qsBPft30twoj1S4PvsxxFo/YxjTLWVZULfY7oIlQ/BVlVLLqcNzv3T262w24Bkbj0wT5KhHVYIop865Epw4NkUlhfe3dyCF4KrgPNmAOPRq/hmgMG/YF+6bVTrnB8DwsXf1w2nHBBC46z8cc0JaQ1K8PSVdCjpPZ8rJh9tKewpP1ELvEBCc7/IdPMP06Oz0tEGSEcc5wBtBIpAprdgfiMXozUCYOtO1bSPsIXpUTyaRcm+KRiU= laobai@plscript.cn
输入公钥标题
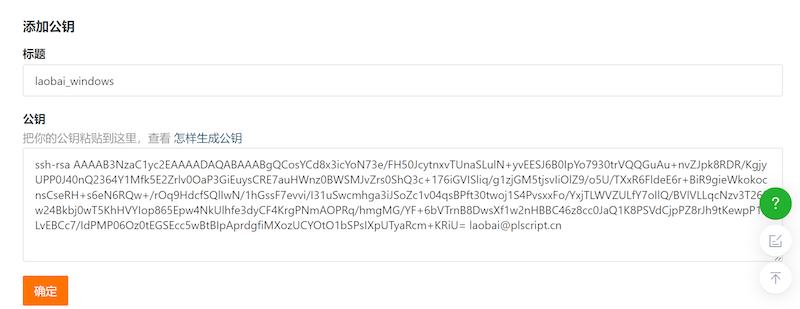
点击确定,SSH公钥设置完成。
d.测试配置是否成功
ssh -T git@gitee.com
Hi laobai! You've successfully authenticated, but GITEE.COM does not provide shell access.
4.本机配置多对SSH密钥
在工作中经常会遇到一台电脑上进行开发,要分别同步到不同git代码仓库的情况。比如,在做公司项目时,公司内部会有个自己搭建的gitlab;自己学习或写一些开源框架时,会将代码上传到GitHub或Gitee等仓库中。
上面的例子中已经生成了一个gitee代码库的密钥,这里再生成一个github的密钥
ssh-keygen -t rsa -C "laobai@plscript.cn_github" -f /c/Users/laobai/.ssh/id_rsa_github这里需要跟上-f参数,指定生成的具体路径及文件名(若不指定,会覆盖上面生成的gitee的密钥)
按照上面的方式,将github的公钥添加到github上
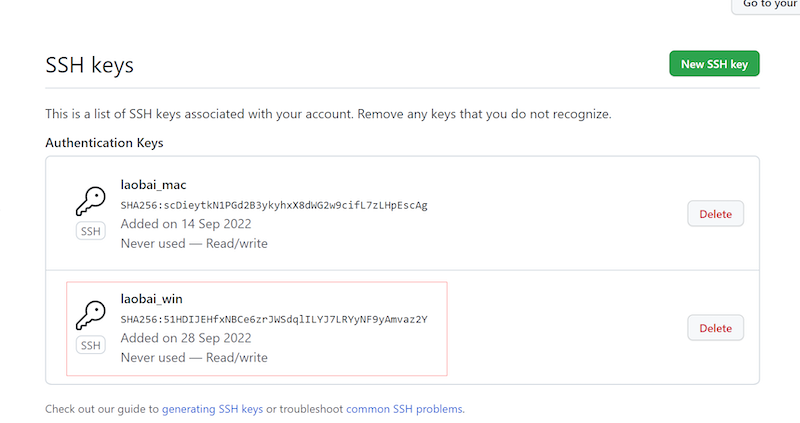
测试配置是否成功
ssh -T git@ip或域名
ssh -T git@github.com
git@github.com: Permission denied (publickey).默认连接的是id_rsa.pub,而不会去连接其他的,所以连接不成功。
在里需要增加一个配置文件,指定哪个私钥去连哪个公钥。
在~/.ssh目录中新建一个config文件
vim config

Host github.com
  User laobai
  IdentityFile ~/.ssh/id_rsa_github

Host gitee.com
  User laobai
  IdentityFile ~/.ssh/id_rsa
其中,Host是域名或ip,User设置的是提交代码时用到的用户名,IdentityFile是对应的私钥
然后再次测试连接是否成功
ssh -T git@github.com
Hi laobai! You've successfully authenticated, but GitHub does not provide shell access.
ssh -T git@gitee.com
Hi laobai! You've successfully authenticated, but GITEE.COM does not provide shell access.扩展:可以为上面的测试连通性增加-vv参数,来输出更多连通信息
ssh -vv git@gitee.com六、实例讲解Git命令
1.初始化一个Git仓库
创建本地Git一般有两种方式,一种是本地创建仓库,与远程空仓库关联;另一种是将远程仓库直接clone到本地目录形成本地仓库。
a.远程空仓库关联创建
在Git仓库管理系统,这里用Gitee做例子,创建一个新的仓库**git_study_02**
在本机的指定目录下创建一个和远程仓库相同名称的目录 git_study_02
在命令终端进入git_study_02目录,执行
git init命令,进行代码仓库的初始化mkdir git_study_02 cd git_study_02 git init Initialized empty Git repository in /Users/laobai/workspaces/git_study_02/.git/查看git_study_02目录的内容,已经生成了
.git目录ll total 0 drwxr-xr-x 3 laobai staff 96 9 28 17:37 ./ drwxr-xr-x 17 laobai staff 544 9 28 17:37 ../ drwxr-xr-x 10 laobai staff 320 9 28 17:47 .git/初始化代码仓库后,需要与远程仓库进行关联
git remote add origin <Remote Repository>git remote add origin git@gitee.com:PLScript/git_study_02.git
b.从已有远程仓库创建
选择某个已有的远程代码仓库,这里用Gitee做例子,**git_study_01**
复制代码仓库地址用于克隆代码库

在本地要存放管理代码库的目录(这个目录必须是空白的普通目录)下,执行克隆命令
git clone <Remote Repository>git clone git@gitee.com:PLScript/git_study_01.git Cloning into 'git_study_01'... remote: Enumerating objects: 63, done. remote: Counting objects: 100% (63/63), done. remote: Compressing objects: 100% (59/59), done. remote: Total 63 (delta 11), reused 0 (delta 0), pack-reused 0 Receiving objects: 100% (63/63), 20.90 KiB | 211.00 KiB/s, done. Resolving deltas: 100% (11/11), done.进入git_study_01目录,并查看文件,确认已经是被git管理的仓库了
$ cd git_study_01/
$ ll
total 32
drwxr-xr-x  12 laobai  staff   384  9 28 18:06 ./
drwxr-xr-x  32 laobai  staff  1024  9 28 18:06 ../
drwxr-xr-x  13 laobai  staff   416  9 28 18:06 .git/
-rw-r--r--   1 laobai  staff    23  9 28 18:06 .gitignore
-rw-r--r--   1 laobai  staff  1317  9 28 18:06 README.md
drwxr-xr-x   9 laobai  staff   288  9 28 18:06 base/
drwxr-xr-x   7 laobai  staff   224  9 28 18:06 common/
drwxr-xr-x   4 laobai  staff   128  9 28 18:06 config/
-rw-r--r--   1 laobai  staff   484  9 28 18:06 conftest.py
drwxr-xr-x   9 laobai  staff   288  9 28 18:06 page/
-rw-r--r--   1 laobai  staff   628  9 28 18:06 pytest.ini
drwxr-xr-x   9 laobai  staff   288  9 28 18:06 testcases/
扩展
a. 从远程仓库克隆时指定新的项目名称
git clone <Remote Repository> <new project name>$ git clone git@gitee.com:PLScript/git_study_01.git test_git Cloning into 'test_git'... remote: Enumerating objects: 63, done. remote: Counting objects: 100% (63/63), done. remote: Compressing objects: 100% (59/59), done. remote: Total 63 (delta 11), reused 0 (delta 0), pack-reused 0 Receiving objects: 100% (63/63), 20.90 KiB | 2.99 MiB/s, done. Resolving deltas: 100% (11/11), done. laobai@LaobaiMBP workspace $ cd test_git/ laobai@LaobaiMBP test_git (master) $b. 从远程仓库克隆指定分支(默认是克隆master分支)
git clone <Remote Repository> -b <branch name> <new project name>git clone git@gitee.com:PLScript/git_study_01.git -b dev test_git_01 Cloning into 'test_git_01'... remote: Enumerating objects: 63, done. remote: Counting objects: 100% (63/63), done. remote: Compressing objects: 100% (59/59), done. remote: Total 63 (delta 11), reused 0 (delta 0), pack-reused 0 Receiving objects: 100% (63/63), 20.90 KiB | 382.00 KiB/s, done. Resolving deltas: 100% (11/11), done. laobai@LaobaiMBP workspace $ cd test_git_01 laobai@LaobaiMBP test_git_01 (dev) $
2.文件或目录添加到暂存区
git status
作用:查看工作区代码的状态
步骤:
a. 使用 git status 命令,查看整个工作区的代码的状态
git status
On branch master

No commits yet

nothing to commit (create/copy files and use "git add" to track)
根据提示可知,当前操作在master分支,没有任何提交。
b.在工作区中新建多个文件及文件夹,目录结构如下
$ tree
.
├── 1.py
├── 2.py
├── 3.py
├── 4.py
├── 5.py
├── test1
│   ├── 6.py
│   └── 7.py
└── test2
    ├── 8.py
    └── 9.py

2 directories, 9 files
再次执行 git status 命令
$ git status
On branch master

No commits yet

Untracked files:
  (use "git add <file>..." to include in what will be committed)

	1.py
	2.py
	3.py
	4.py
	5.py
	test1/
	test2/

nothing added to commit but untracked files present (use "git add" to track)
根据提示,当前操作在master分支,没有任何提交,有未被追踪的文件和文件夹,即未被git管理的文件
git add file
作用:添加单个文件到暂存区
步骤:
$ git add 1.py
$ git status
On branch master

No commits yet

Changes to be committed:
  (use "git rm --cached <file>..." to unstage)

	new file:   1.py

Untracked files:
  (use "git add <file>..." to include in what will be committed)

	2.py
	3.py
	4.py
	5.py
	test1/
	test2/
可以看到1.py已经纳入git的管理,添加到暂存区中
git add file1 file2 …
作用:添加多个文件到暂存区
步骤:
$ git add 2.py 3.py
$ git status
On branch master

No commits yet

Changes to be committed:
  (use "git rm --cached <file>..." to unstage)

	new file:   1.py
	new file:   2.py
	new file:   3.py

Untracked files:
  (use "git add <file>..." to include in what will be committed)

	4.py
	5.py
	test1/
	test2/
git add directory
作用:添加文件夹到暂存区
步骤:
$ git add test1
$ git status
On branch master

No commits yet

Changes to be committed:
  (use "git rm --cached <file>..." to unstage)

	new file:   1.py
	new file:   2.py
	new file:   3.py
	new file:   test1/6.py
	new file:   test1/7.py

Untracked files:
  (use "git add <file>..." to include in what will be committed)

	4.py
	5.py
	test2/
git add .
作用:添加多个文件及目录到暂存区
步骤:
$ git add .
$ git status
On branch master

No commits yet

Changes to be committed:
  (use "git rm --cached <file>..." to unstage)

	new file:   1.py
	new file:   2.py
	new file:   3.py
	new file:   4.py
	new file:   5.py
	new file:   test1/6.py
	new file:   test1/7.py
	new file:   test2/8.py
	new file:   test2/9.py
3.文件从暂存区删除
git rm –cache file
作用:将文件从暂存区删除,返回到工作区 (将文件错误的添加到了暂存区)
步骤:
$ git rm --cache 1.py
rm '1.py'
$ git status
On branch master

No commits yet

Changes to be committed:
  (use "git rm --cached <file>..." to unstage)

	new file:   2.py
	new file:   3.py
	new file:   4.py
	new file:   5.py
	new file:   test1/6.py
	new file:   test1/7.py
	new file:   test2/8.py
	new file:   test2/9.py

Untracked files:
  (use "git add <file>..." to include in what will be committed)

	1.py
git rm -f file
作用:将文件从暂存区删除,并删除文件 (暂存区和工作区都已不需要该文件)
步骤:
$ git rm -f 2.py
rm '2.py'
$ git status
On branch master

No commits yet

Changes to be committed:
  (use "git rm --cached <file>..." to unstage)

	new file:   3.py
	new file:   4.py
	new file:   5.py
	new file:   test1/6.py
	new file:   test1/7.py
	new file:   test2/8.py
	new file:   test2/9.py

Untracked files:
  (use "git add <file>..." to include in what will be committed)

	1.py
4.暂存区的文件提交到本地仓库
git commit -m “备注信息”
作用:常用的代码提交命令
步骤:
a.提交前先看一下当前暂存区的内容
git status
On branch master

No commits yet

Changes to be committed:
  (use "git rm --cached <file>..." to unstage)

	new file:   3.py
	new file:   4.py
	new file:   5.py
	new file:   test1/6.py
	new file:   test1/7.py
	new file:   test2/8.py
	new file:   test2/9.py

Untracked files:
  (use "git add <file>..." to include in what will be committed)

	1.py
b.将暂存区的内容提交到本地仓库
git commit -m '备注信息'
$ git commit -m '第一次提交'
[master (root-commit) 67ec82c] 第一次提交
 7 files changed, 7 insertions(+)
 create mode 100644 3.py
 create mode 100644 4.py
 create mode 100644 5.py
 create mode 100644 test1/6.py
 create mode 100644 test1/7.py
 create mode 100644 test2/8.py
create mode 100644 test2/9.py存在暂存区的文件都提交到了本地仓库。再次执行git status
$ git status
On branch master
Untracked files:
  (use "git add <file>..." to include in what will be committed)

	1.py

nothing added to commit but untracked files present (use "git add" to track)
只有一个未被git管理的1.py文件
c.可以使用git log命令查看提交记录
$ git log
commit 67ec82c6813dba52693a7432500587f752b98b1a (HEAD -> master)
Author: laobai <laobai@plscript.cn>
Date:   Thu Sep 29 18:05:17 2022 +0800
其中commit id是一串40位的加密hash值。上面进行commit提交时‘[master (root-commit) 67ec82c] 第一次提交’中有一串7位字符‘67ec82c’,这7位即是40位hash值的前7位,一般情况下,用40位hash值的前7位代表本次提交。
git commit
作用:提交到本地仓库时,命令行中不写备注,执行命令时,会自动打开提交记录文件,输入备注信息后提交
步骤:
a.将1.py添加到暂存区
$ git add 1.py
$ git status
On branch master
Changes to be committed:
  (use "git reset HEAD <file>..." to unstage)

new file: 1.pyb.使用git commit命令,不跟其他参数进行提交
git commit

  1
  2 # Please enter the commit message for your changes. Lines starting
  3 # with '#' will be ignored, and an empty message aborts the commit.
  4 #
  5 # On branch master
  6 # Changes to be committed:
  7 #   new file:   1.py
8 #执行命令后,会自动用vi打开COMMIT_EDITMSG文件,光标停留在第一行,输入备注信息。这种填写备注方式适合在备注内容比较多的情况,因为-m参数写的备注文案只有一行。
c.输入备注信息,保存退出后,1.py文件已经提交到本地仓库
$ git commit
[master ca86d32] test
 1 file changed, 1 insertion(+)
 create mode 100644 1.py
$ git status
On branch master
nothing to commit, working tree clean

$ git log
commit ca86d32f3f810e5646583c1c08ffb075a9463532 (HEAD -> master)
Author: laobai <laobai@plscript.cn>
Date:   Fri Sep 30 01:16:06 2022 +0800

    test

commit 67ec82c6813dba52693a7432500587f752b98b1a
Author: laobai <laobai@plscript.cn>
Date:   Thu Sep 29 18:05:17 2022 +0800

    第一次提交
git commit -a
作用:将工作区中的文件,跳过暂存区,直接提交到本地仓库
步骤:
a.修改某个已经commit的文件的内容,比如3.py。修改完毕后,再用git status查看一下状态
$ vim 3.py
$ git status
On branch master
Changes not staged for commit:
  (use "git add <file>..." to update what will be committed)
  (use "git checkout -- <file>..." to discard changes in working directory)

	modified:   3.py

no changes added to commit (use "git add" and/or "git commit -a")b.使用上面git status最后一行提到命令git commit -a可以直接将工作目录中的文件提交到本地仓库,而无需先使用git add命令将文件添加到暂存区
$ git commit -a -m "update 3.py"
[master eef003b] update 3.py
 1 file changed, 1 insertion(+)
$ git status
On branch master
nothing to commit, working tree clean
$ git log
commit eef003b3e50bc5be99a2a6ea019c18dc5b6d87d0 (HEAD -> master)
Author: laobai <laobai@plscript.cn>
Date:   Fri Sep 30 01:24:31 2022 +0800

    update 3.py

commit ca86d32f3f810e5646583c1c08ffb075a9463532
Author: laobai <laobai@plscript.cn>
Date:   Fri Sep 30 01:16:06 2022 +0800

    test

commit 67ec82c6813dba52693a7432500587f752b98b1a
Author: laobai <laobai@plscript.cn>
Date:   Thu Sep 29 18:05:17 2022 +0800

    第一次提交
通过git提交日志可以看到修改后的3.py已经提交到本地仓库。
(git commit -a可以跳过添加暂存区的过程,但不建议使用-a参数(缺少了中间确认的过程))
git commit –amend
作用:追加提交,因为每次提交都会生成一条提交记录,若不想生成新的提交记录,而是将本次提交的内容追加到上一次提交的信息中
步骤:
a.修改文件4.py
$ vim 4.py
$ git status
On branch master
Changes not staged for commit:
  (use "git add <file>..." to update what will be committed)
  (use "git checkout -- <file>..." to discard changes in working directory)

	modified:   4.py

no changes added to commit (use "git add" and/or "git commit -a")b.执行git log确认提交记录
$ git log
commit eef003b3e50bc5be99a2a6ea019c18dc5b6d87d0 (HEAD -> master)
Author: laobai <laobai@plscript.cn>
Date:   Fri Sep 30 01:24:31 2022 +0800

    update 3.py

commit ca86d32f3f810e5646583c1c08ffb075a9463532
Author: laobai <laobai@plscript.cn>
Date:   Fri Sep 30 01:16:06 2022 +0800

    test

commit 67ec82c6813dba52693a7432500587f752b98b1a
Author: laobai <laobai@plscript.cn>
Date:   Thu Sep 29 18:05:17 2022 +0800

第一次提交c.使用git commit --amend进行追加提交
$ git commit --amend
[master 485e78b] update 4.py
 Date: Fri Sep 30 01:24:31 2022 +0800
 1 file changed, 1 insertion(+)
$ git log
commit 485e78b5a2b7949dff48bdce9b4ea2eeda7aa06a (HEAD -> master)
Author: laobai <laobai@plscript.cn>
Date:   Fri Sep 30 01:24:31 2022 +0800

    update 4.py

commit ca86d32f3f810e5646583c1c08ffb075a9463532
Author: laobai <laobai@plscript.cn>
Date:   Fri Sep 30 01:16:06 2022 +0800

    test

commit 67ec82c6813dba52693a7432500587f752b98b1a
Author: laobai <laobai@plscript.cn>
Date:   Thu Sep 29 18:05:17 2022 +0800

    第一次提交
追加提交成功,查看提交的日志还是3条
5.提交日志查询
git log
作用:查看版本库修改记录
步骤:
$ git log
commit d63d72966d195a595a500c78d4f6b0dc8c68f051 (HEAD -> master, origin/master)
Author: laobai <laobai@plscript.cn>
Date:   Sat Oct 1 00:26:57 2022 +0800

    update 1.py

commit 6365260f010f48583d7f817076113e222ee8aae5
Merge: cf18537 7f9f1a3
Author: laobai <laobai@plscript.cn>
Date:   Fri Sep 30 21:13:36 2022 +0800

    处理冲突

commit 7f9f1a3cb320122ee653056971863ff37af19aa0 (dev1)
Author: laobai <laobai@plscript.cn>
Date:   Fri Sep 30 21:12:33 2022 +0800

    update

commit cf18537293218450fa9ccc2cd02fca0926afd156
Author: laobai <laobai@plscript.cn>
Date:   Fri Sep 30 21:10:39 2022 +0800

    update 1.py

commit ecd6a35f3c5bddf4c78f7362ef0e7d481e0fcd79
Merge: 8fc86cd 2292a83
Author: laobai <laobai@plscript.cn>
Date:   Fri Sep 30 20:45:03 2022 +0800

    处理合并冲突

commit 2292a83b5c608a80bd732761738adcea92d08ebc
Author: laobai <laobai@plscript.cn>
Date:   Fri Sep 30 17:37:22 2022 +0800

    updat 1.py

commit 8fc86cd90c7f321e0a101b743f77a1f7545c0d25
Author: laobai <laobai@plscript.cn>
Date:   Fri Sep 30 17:33:44 2022 +0800

    update 1.py

commit 485e78b5a2b7949dff48bdce9b4ea2eeda7aa06a
Author: laobai <laobai@plscript.cn>
Date:   Fri Sep 30 01:24:31 2022 +0800

    update 4.py

commit ca86d32f3f810e5646583c1c08ffb075a9463532
Author: laobai <laobai@plscript.cn>
Date:   Fri Sep 30 01:16:06 2022 +0800

    test

commit 67ec82c6813dba52693a7432500587f752b98b1a
Author: laobai <laobai@plscript.cn>
Date:   Thu Sep 29 18:05:17 2022 +0800

    第一次提交
git log –oneline
作用:单行显示提交记录,可以在后面跟-n参数显示最新的n条
步骤:
$ git log --oneline
d63d729 (HEAD -> master, origin/master) update 1.py
6365260 处理冲突
7f9f1a3 (dev1) update
cf18537 update 1.py
ecd6a35 处理合并冲突
2292a83 updat 1.py
8fc86cd update 1.py
485e78b update 4.py
ca86d32 test
67ec82c 第一次提交
$ git log --oneline -5
d63d729 (HEAD -> master, origin/master) update 1.py
6365260 处理冲突
7f9f1a3 (dev1) update
cf18537 update 1.py
ecd6a35 处理合并冲突git log –graph –oneline
作用:图形化显示当前分支的提交日志,可以在后面跟--all参数显示全部分支的提交日志
步骤:
$ git log --graph --oneline
* d63d729 (HEAD -> master, origin/master) update 1.py
*   6365260 处理冲突
|\
| * 7f9f1a3 (dev1) update
* | cf18537 update 1.py
|/
*   ecd6a35 处理合并冲突
|\
| * 2292a83 updat 1.py
* | 8fc86cd update 1.py
|/
* 485e78b update 4.py
* ca86d32 test
* 67ec82c 第一次提交
git log –author=提交人
作用:查看某人的提交记录
步骤:
$ git log --author=laobai
commit 7f9f1a3cb320122ee653056971863ff37af19aa0 (HEAD -> dev1)
Author: laobai <laobai@plscript.cn>
Date:   Fri Sep 30 21:12:33 2022 +0800

    update

commit ecd6a35f3c5bddf4c78f7362ef0e7d481e0fcd79
Merge: 8fc86cd 2292a83
Author: laobai <laobai@plscript.cn>
Date:   Fri Sep 30 20:45:03 2022 +0800

    处理合并冲突

commit 2292a83b5c608a80bd732761738adcea92d08ebc
Author: laobai <laobai@plscript.cn>
Date:   Fri Sep 30 17:37:22 2022 +0800

    updat 1.py

commit 8fc86cd90c7f321e0a101b743f77a1f7545c0d25
Author: laobai <laobai@plscript.cn>
Date:   Fri Sep 30 17:33:44 2022 +0800

    update 1.py

commit 485e78b5a2b7949dff48bdce9b4ea2eeda7aa06a
Author: laobai <laobai@plscript.cn>
Date:   Fri Sep 30 01:24:31 2022 +0800

    update 4.py

commit ca86d32f3f810e5646583c1c08ffb075a9463532
Author: laobai <laobai@plscript.cn>
Date:   Fri Sep 30 01:16:06 2022 +0800

    test

commit 67ec82c6813dba52693a7432500587f752b98b1a
Author: laobai <laobai@plscript.cn>
Date:   Thu Sep 29 18:05:17 2022 +0800

    第一次提交
git reflog
作用:查看当前分支所有操作历史记录
步骤:
$ git reflog
7f9f1a3 (HEAD -> dev1) HEAD@{0}: checkout: moving from master to dev1
d63d729 (origin/master, master) HEAD@{1}: commit: update 1.py
6365260 HEAD@{2}: commit (merge): 处理冲突
cf18537 HEAD@{3}: checkout: moving from dev1 to master
7f9f1a3 (HEAD -> dev1) HEAD@{4}: commit: update
ecd6a35 HEAD@{5}: checkout: moving from master to dev1
cf18537 HEAD@{6}: commit: update 1.py
ecd6a35 HEAD@{7}: checkout: moving from dev1 to master
ecd6a35 HEAD@{8}: checkout: moving from master to dev1
ecd6a35 HEAD@{9}: checkout: moving from dev2 to master
2292a83 HEAD@{10}: checkout: moving from master to dev2
ecd6a35 HEAD@{11}: commit (merge): 处理合并冲突
8fc86cd HEAD@{12}: checkout: moving from dev2 to master
2292a83 HEAD@{13}: checkout: moving from master to dev2
8fc86cd HEAD@{14}: checkout: moving from dev2 to master
2292a83 HEAD@{15}: commit: updat 1.py
485e78b HEAD@{16}: checkout: moving from master to dev2
8fc86cd HEAD@{17}: commit: update 1.py
485e78b HEAD@{18}: checkout: moving from dev2 to master
485e78b HEAD@{19}: checkout: moving from master to dev2
485e78b HEAD@{20}: checkout: moving from dev2 to master
485e78b HEAD@{21}: checkout: moving from master to dev2
485e78b HEAD@{22}: checkout: moving from dev2 to master
485e78b HEAD@{23}: checkout: moving from master to dev2
485e78b HEAD@{24}: checkout: moving from dev2 to master
485e78b HEAD@{25}: checkout: moving from master to dev2
485e78b HEAD@{26}: commit (amend): update 4.py
eef003b HEAD@{27}: commit: update 3.py
ca86d32 HEAD@{28}: commit: test
67ec82c HEAD@{29}: commit (initial): 第一次提交
6.本地仓库的文件撤回暂存区
git commit后,需要撤回commit,一般有以下三种方式(即可以实现回退到某个commit,也可以从之前的commit状态下前进到某个commit):
git reset –soft 版本号
作用:回退到对应的版本,不删除工作区改动的代码,撤销commit,不撤销git add .
步骤:
a. 使用--soft commit id回退到某个commit
$ git status
On branch master
Your branch is up to date with 'origin/master'.

nothing to commit, working tree clean
$ git reset --soft 636526
$ git status
On branch master
Your branch is behind 'origin/master' by 1 commit, and can be fast-forwarded.
(use "git pull" to update your local branch)
Changes to be committed:
(use "git reset HEAD <file>..." to unstage)
modified: 1.pyb.使用--soft commit id前进到某个commit
$ git reset --hard d63d729
HEAD is now at d63d729 update 1.pyc.上面命令中的参数commit id可以替换成HEAD~n来表示
$ git reset --soft HEAD~5
$ git status
On branch master
Your branch is behind 'origin/master' by 7 commits, and can be fast-forwarded.
  (use "git pull" to update your local branch)

Changes to be committed:
  (use "git reset HEAD <file>..." to unstage)

	modified:   1.py
	new file:   10.py
	new file:   2.py
	modified:   3.py
	modified:   4.py
	new file:   test3/11.py
上面的命令回到向前5个版本
d.回退到上一个版本,参数可以写成HEAD^
$ git reset --soft HEAD^git reset –mixed 版本号
作用:回退到对应的版本,不删除工作区改动的代码,撤销commit,撤销git add .
步骤:
a.使用--mixed commit id回退到某个commit
$ git reset --mixed 636526b.上面命令中的参数commit id可以替换成HEAD~n来表示
git reset --mixed HEAD~5git reset –hard 版本号
作用:回退到对应的版本,删除工作区的改动代码,撤销commit,撤销git add . 回到commit对应版本号时的状态
步骤:
a.使用--hard commit id回退到某个commit
$ git reset --hard 636526b.上面命令中的参数commit id可以替换成HEAD~n来表示
git reset --hard HEAD~57.分支管理
几乎所有的版本控制系统都以某种形式支持分支。 使用分支意味着你可以把你的工作从开发主线上分离开来,以免影响开发主线。
Git操作分支很便捷,创建、切换、合并等都很方便。
Git 的分支,其实本质上仅仅是指向提交对象的可变指针。 Git 的默认分支名字是 master。 在多次提交操作之后,你其实已经有一个指向最后那个提交对象的 master 分支。 master 分支会在每次提交时自动向前移动。master分支是一个跟其他分支完全没有区别的分支,之所以几乎每个仓库都会有master分支,是因为git init命令默认创建它,当然也可以命名成其他分支名,有些资料上,将master分支命名为main分支。
查看分支
git branch
作用:列出所有本地分支
步骤:
$ git branch
* master
git branch -a
作用:列出所有本地分支和远程分支
步骤:
$ git branch -a
* master
git branch -vv
作用:查看当前分支与远程分支对应关系
步骤:
$ git branch -vv
* master 485e78b update 4.py
新建分支
git branch [branch-name]
作用:新建一个分支,但依然停留在当前分支
步骤:
laobai@LaobaiMBP git_study_02 (master) $ git branch dev1
laobai@LaobaiMBP git_study_02 (master) $ 通过git branch查看分支
$ git branch
  dev1
* master
git checkout -b [branch-name]
作用:新建一个分支,并切换到该新分支
步骤:
laobai@LaobaiMBP git_study_02 (master) $ git checkout -b dev2
M	4.py
Switched to a new branch 'dev2'
laobai@LaobaiMBP git_study_02 (dev2) $ 通过git branch查看分支
$ git branch
  dev1
* dev2
  master
快速切换到上一个分支
git checkout -
作用:快速切换到上一次使用的分支
步骤:
laobai@LaobaiMBP git_study_02 (dev2) $ git checkout master
M	4.py
Switched to branch 'master'
laobai@LaobaiMBP git_study_02 (master) $ git checkout dev2
M	4.py
Switched to branch 'dev2'
laobai@LaobaiMBP git_study_02 (dev2) $ git checkout -
M	4.py
Switched to branch 'master'
laobai@LaobaiMBP git_study_02 (master) $ git checkout -
M	4.py
Switched to branch 'dev2'
laobai@LaobaiMBP git_study_02 (dev2) $
删除分支
git branch -d [branch name]
作用:删除指定的分支
步骤:
$ git branch
  dev1
* dev2
  master

$ git branch -d dev1
Deleted branch dev1 (was 485e78b).

$ git branch
* dev2
  master
合并分支
git merge
作用:合并任意两个分支;而master作为主分支,只能是其他分支合并到master分支;
没有文件冲突时,可以直接合并,有文件冲突(两个分支都修改了同一个文件甚至同一行代码)时,合并时会提示先解决冲突再合并
步骤:
a. 在master分支,修改1.py
$ vim 1.py
将
print('hello git')
修改为
print('hello git,hellow 1.py')
b.添加并提交修改
$ git add .
$ git commit -m "update 1.py"
[master 8fc86cd] update 1.py
 1 file changed, 1 insertion(+), 1 deletion(-)
c.切换到dev2分支
laobai@LaobaiMBP git_study_02 (master) $ git checkout -
Switched to branch 'dev2'
laobai@LaobaiMBP git_study_02 (dev2) $
d.修改dev2分支的1.py
$ vim 1.py
将
print('hello git')
修改为
print('hellow 1.py')
e.添加并提交修改
$ git add .
$ git commit -m "updat 1.py"
[dev2 2292a83] updat 1.py
 1 file changed, 1 insertion(+), 1 deletion(-)
f.再次切换到master分支
laobai@LaobaiMBP git_study_02 (dev2) $ git checkout master
Switched to branch 'master'
laobai@LaobaiMBP git_study_02 (master) $ g.使用git merge命令将dev2分支合并到master分支
$ git merge dev2
Auto-merging 1.py
CONFLICT (content): Merge conflict in 1.py
Automatic merge failed; fix conflicts and then commit the result.
合并分支提示:自动合并1.py出现冲突,自动合并失败;修复冲突,再次提交。
h.根据上面的提示,打开1.py文件处理冲突
$ vim 1.py

<<<<<<< HEAD
print('hello git,hellow 1.py')
=======
print('hello 1.py')
>>>>>>> dev21.py文件的内容变成了上面的样子。=上面的部分是当前所在的合并分支master的内容,=下面的部分是被合并的分支dev2的内容。需要人为判定哪部分是真正想要的,不要需要手动删除,这里保留这一行print('hello git,hellow 1.py'),其他行均要删除,保存退出。
i.上面处理冲突修改了1.py,需要添加并提交到仓库。commit之后会自动合并分支,无需再次手动合并。
$ git add .
$ git commit -m '处理合并冲突'
[master ecd6a35] 处理合并冲突
8.本地仓库的文件提交到远程仓库
a.首次提交到远程仓库
git push -u origin master
作用:将本地master分支推送到与本地关联的名称为origin的远程仓库的master分支,因为本地与远程的分支都是master,远程的master省略了,全命令为:git push -u origin master:master,其中-u是指定一个默认的远程仓库,这样再次推送代码时,命令可以简写为:git push
步骤:
$ git push -u origin master
Enumerating objects: 35, done.
Counting objects: 100% (35/35), done.
Delta compression using up to 8 threads
Compressing objects: 100% (19/19), done.
Writing objects: 100% (35/35), 2.36 KiB | 805.00 KiB/s, done.
Total 35 (delta 10), reused 0 (delta 0)
remote: Powered by GITEE.COM [GNK-6.4]
To gitee.com:PLScript/git_study_02.git
 * [new branch]      master -> master
Branch 'master' set up to track remote branch 'master' from 'origin'.
到gitee的仓库查看推送的代码:

b.非首次提交远程仓库
git push
作用:将本地仓库的代码同步更新到关联的远程仓库。执行这个git push简写命令前必须指定了默认的推送目标仓库
步骤:
$ vim 1.py
$ git add .
$ git commit -m 'update 1.py'
[master d63d729] update 1.py
 1 file changed, 1 insertion(+), 1 deletion(-)
$ git push
Enumerating objects: 5, done.
Counting objects: 100% (5/5), done.
Delta compression using up to 8 threads
Compressing objects: 100% (2/2), done.
Writing objects: 100% (3/3), 285 bytes | 285.00 KiB/s, done.
Total 3 (delta 1), reused 0 (delta 0)
remote: Powered by GITEE.COM [GNK-6.4]
To gitee.com:PLScript/git_study_02.git
   6365260..d63d729  master -> master
9.撤回已经push的代码
将已经push到远程仓库的代码撤回,使用git revert [commit id]命令
git revert [commit id]
作用:将已经push到远程仓库的代码回退到之前的某个commit提交
步骤:
git revert 920e8f8git reset 是回退commit,git log中的记录有被删除,git reflog还会保存;git revert是生成一个新的commit记录将仓库的代码重置到某个commit,所以git log的记录完整。
10.从远程仓库拉取代码到本地
从远程仓库拉取代码有两个命令:git fetch和git pull
git fetch
作用:获取远程仓库的指定分支
步骤:
git fetch origin master将远程仓库的master拉取到本地分支,不进行合并
git pull
作用:获取远程仓库的指定分支并合并,git pull = git fetch + git merge
git pull <远程主机名> <远程分支名>:<本地分支名>
步骤:
$ git pull origin master:master
remote: Enumerating objects: 55, done.
remote: Counting objects: 100% (55/55), done.
remote: Compressing objects: 100% (36/36), done.
remote: Total 55 (delta 19), reused 0 (delta 0), pack-reused 0
Unpacking objects: 100% (55/55), done.
From gitee.com:PLScript/git_study_02
 * [new branch]      master     -> master
 * [new branch]      master     -> origin/master
$ ll
total 48
drwxr-xr-x  12 laobai  staff   384 10  1 12:13 ./
drwxr-xr-x  35 laobai  staff  1120 10  1 12:13 ../
drwxr-xr-x  13 laobai  staff   416 10  1 12:13 .git/
-rw-r--r--   1 laobai  staff    19 10  1 12:13 1.py
-rw-r--r--   1 laobai  staff    13 10  1 12:13 10.py
-rw-r--r--   1 laobai  staff    15 10  1 12:13 2.py
-rw-r--r--   1 laobai  staff    33 10  1 12:13 3.py
-rw-r--r--   1 laobai  staff    28 10  1 12:13 4.py
-rw-r--r--   1 laobai  staff    14 10  1 12:13 5.py
drwxr-xr-x   4 laobai  staff   128 10  1 12:13 test1/
drwxr-xr-x   4 laobai  staff   128 10  1 12:13 test2/
drwxr-xr-x   3 laobai  staff    96 10  1 12:13 test3/
若远程分支与本地当前所在分支进行合并,冒号后面的本地分支名可以省略
$ git pull origin master
remote: Enumerating objects: 55, done.
remote: Counting objects: 100% (55/55), done.
remote: Compressing objects: 100% (36/36), done.
remote: Total 55 (delta 19), reused 0 (delta 0), pack-reused 0
Unpacking objects: 100% (55/55), done.
From gitee.com:PLScript/git_study_02
 * branch            master     -> FETCH_HEAD
 * [new branch]      master     -> origin/master
$ ll
total 48
drwxr-xr-x  12 laobai  staff   384 10  1 12:16 ./
drwxr-xr-x  36 laobai  staff  1152 10  1 12:16 ../
drwxr-xr-x  13 laobai  staff   416 10  1 12:16 .git/
-rw-r--r--   1 laobai  staff    19 10  1 12:16 1.py
-rw-r--r--   1 laobai  staff    13 10  1 12:16 10.py
-rw-r--r--   1 laobai  staff    15 10  1 12:16 2.py
-rw-r--r--   1 laobai  staff    33 10  1 12:16 3.py
-rw-r--r--   1 laobai  staff    28 10  1 12:16 4.py
-rw-r--r--   1 laobai  staff    14 10  1 12:16 5.py
drwxr-xr-x   4 laobai  staff   128 10  1 12:16 test1/
drwxr-xr-x   4 laobai  staff   128 10  1 12:16 test2/
drwxr-xr-x   3 laobai  staff    96 10  1 12:16 test3/
11.暂存 stash
正在开发过程中,遇到了需要紧急处理的代码处理问题,比如线上紧急bug修复。这是需要暂停当前分支的开发,修复完bug后,再重新启动暂停的分支。
$ git stash
Saved working directory and index state WIP on master: ecd6a35
工作区已经被暂存,这是可以新建一个分支,处理紧急事务,新的分支上线后,再次回复之前被暂存的分支内容
 $ git stash pop
On branch master
Your branch is behind 'plscript/master' by 11 commits, and can be fast-forwarded.
  (use "git pull" to update your local branch)

Changes not staged for commit:
  (use "git add <file>..." to update what will be committed)
  (use "git checkout -- <file>..." to discard changes in working directory)

	modified:   1.py

no changes added to commit (use "git add" and/or "git commit -a")
Dropped refs/stash@{0} (1bf1b8392393efaf988bb105027c80ce3f85c481)恢复到暂存之前的状态。命令中的pop参数表示恢复暂存后删除暂存记录
12.其他命令
git rebase
将多次commit操作合并成1个
作用:本地分支进行了多次commit,在还没有push之前,可以将多次commit通过rebase命令进行合并,最早push到远程仓库的commit是合并后的1条。若已经push过的commit将无法使用rebase命令
步骤:
git rebase -i HEAD~2本地仓库有新的commit需要合并
作用:本地开发一个分支,在commit之前,本地仓库已经被其他人commit了多次,这里可以先用rebase合并当前分支与本地仓库的差异,然后在commit到本地仓库
步骤:
git rebase origin若当前需要rebase的分支是多人同时开发,一定要全部人都合并过了再进行rebase,否则会导致某些人的提交记录丢失
git remote
查看远程仓库的名称
$ git remote
origin
修改远程仓库的名称
$ git remote rename origin plscript
$ git remote
plscript
查看本地仓库对应的远程仓库
git remote -v
plscript	git@gitee.com:PLScript/git_study_02.git (fetch)
plscript	git@gitee.com:PLScript/git_study_02.git (push)
git diff
作用:比较两个分支的差异
步骤:
$ git diff dev1 master
diff --git a/1.py b/1.py
index 4e825f9..0c76b9e 100644
--- a/1.py
+++ b/1.py
@@ -1 +1 @@
-print('hello 1.py')
+print('hello git,hellow 1.py')
diff --git a/test3/11.py b/test3/11.py
deleted file mode 100644
index e5acfda..0000000
--- a/test3/11.py
+++ /dev/null
@@ -1,2 +0,0 @@
-
-i>>>>>> dev2
